This blog contains training videos on NAS Storage. This blog cover training videos on netapp cluster mode storage. Along with the training videos the blog explains about the topic in details for better understanding of users.
Showing posts with label Netapp Cluster Mode. Show all posts
Showing posts with label Netapp Cluster Mode. Show all posts
Storage efficiency features ensure that there is no wastage of storage capacity and all disk capacity is used in efficient manner without impacting performance. It lowers operation cost.
Storage Administrator has to manage it by enabling and monitoring various storage efficiency feature.
Types Of Storage Efficiency In NetApp Cluster Mode
There are four types Storage efficiency features available in NetApp cluster mode.
De-Duplication
Thin Provisioning
Compression
FlexClone
Storage Efficiency Feature De-Duplication
De-duplication reduces the amount of physical storage required for a volume by discarding duplicate blocks and updating the pointer to refer to a single block.
A common example where deduplication is useful is Mail attachment. Same mail attachment is stored by many user which consumes lot of space.
During normal data writing process each data block is assigned with a unique signature. When De-duplication process starts Data Ontap compares these signature and removes all data block which has same signature and keeps only one data block for reference.
Then Data Ontap updates the pointer to the single data blocks. In this way many data blocks is reclaimed and storage efficiency to store same data increases.
Storage Efficiency Feature Thin-Provisioning
A thin-provisioned volume or LUN is one for which storage is not reserved in advance. Instead, storage is allocated dynamically, as it is needed. It means when user starts putting data in volume actual space is allocated to volume from its containing aggregate.
Free space is released back to the storage system when data in the volume or LUN is deleted.
Thin Provisioning support over provisioning. Example for 5 TB of aggregate you can allocate 7 TB of volumes. As not every user uses all storage that is assigned to them.
Storage Efficiency Feature Compression
Compression reduces the amount of physical storage required for a volume by combining data blocks in compression groups. Then each of these compression groups is stored as a single block.
There are two types of compression:
Inline Compression – Compression happens in memory before the data is written to disk. Post Compression – Compression happens after the data is written to the disk.
Storage Efficiency Feature FlexClone
FlexClone technology references Snapshot metadata to create writable, point-in-time copies of a volume. Flexclone Copies share data blocks with their parents, hence it does not consumes any extra storage.
You can split the FlexClone to separate it from its parent volume. Once split operation is done the volume will start consumes extra space from aggregate. Watch this video to know more about Flexclone.
Below is a youtube video which explains about storage efficiency in netapp cluster mode. Subscribe To Channel for More Upcoming Videos.
In this video we will discuss about hardware architecture of NetApp Cluster Mode which includes Components of netapp cluster mode, how Netapp hardware are connected to each other and types of cluster mode and finally we will see how requests flows in netapp cluster mode.
If you are interested for SAN architecture the click here to read more about it.
Components Of NetApp Cluster Mode Architecture
There are three main components of netapp cluster mode Architecture which are described below.
Controllers Or Node Netapp Cluster Mode
Controller of node is the computing part of NetApp which process all incoming and outgoing request for netapp cluster. Netapp node has slots having IO/Module which has Ethernet, FC, FCoE and SAS Port. Ethernet ports connects to network switches for LAN connectivity. FC port connects to SAN switches which support FC protocol. You can use FCoE for both as Ethernet and FC ports.
Last SAS ports connects the controller to disk shelves. Node also contains main other small hardware such as NVRAM, CPU, PSU and Fans which has different purpose.
Disk Shelves NetApp Cluster Mode
Disk shelves in Netapp Cluster Mode consists of Physical disks. NetApp support various types of disk and has various models as well. Click the link for more details.
Disk shelves and controller are connected to each other via SAS ports. In a HA Pair the disk shelves are connected to both controller.
Inter Cluster Switches NetApp Cluster Mode
Inter cluster switches or cluster switches are network switches which provides connection between Controllers for data flows. Each node in cluster has minimum of two cluster port which connects to cluster switches.
What Is Cluster Mode NetApp
Cluster Mode NetApp is basically combination of multiple HA Pair Nodes which are interconnected via Inter Cluster Switches for data flow.
Cluster Mode Set Up Can be of three types. First once is Single Node Cluster, second one is Two Node Switchless Cluster and the last type is Two Node Netap Cluster with cluster switches.
In Netapp Cluster Mode the cluster with switches can have maximum of 24 nodes which means 12 HA Pairs.
Single Node Netapp Cluster
In Single node netapp cluster has only one node. Single node cluster does not provide and redundancy and always has risk of outage and data loss.
Two Node Switch less NetApp Cluster
Two node switch less cluster has two nodes in HA pair. These nodes are connected to each other directly and not via inter cluster switches. The direct connection between two node for data flow is called as Cluster Interconnect.
Two Node NetApp Cluster With Cluster Switch
In Two Node NetApp Cluster the nodes are connected to each other via Inter Cluster Switches for Data Flow.
Four Node NetApp Cluster Mode With Cluster Switch
Four node NetApp Cluster consists of four node means two HA pair. All Nodes are connected to two cluster switches. If you want to add another HA pair to cluster then first perform the physical connection of nodes to both cluster switches.
How Data Flows In NetApp Cluster Mode
First Read or write request comes to any one of the NetApp node. Data Ontap check if the data resides on local node or remote node.
If Data found in local node request is processed and sent back to client through same path. Now If Data does not present in local node and exists in remote node then request is sent to remote node via cluster network.
In remote node data is processed and the request is sent back to client through the same path.
Hope you gain some knowledge on hardware architecture of netapp cluster mode. For all list of blog on netapp cluster mode click here.
To watch a this blog on Video mode visit our YouTube Channel and Subscribe as well.
How To Re-host Volume From One SVM To Another SVM Cluster Mode NetApp
In this Blog we will see what is Volume Rehost and how we can move or rehost volume from one vserver to another vserver in NetApp Cluster Mode. In later section we will also move a CIFS volume from one SVM to another SVM via command line.
What is Volume Rehost in NetApp Cluster Mode
Volume rehost enables you to reassign NAS or SAN volumes from one storage virtual machine (SVM, formerly known as Vserver) to another SVM without requiring a SnapMirror copy.
Volume rehost is a disruptive operation for data access. Hence you should get a downtime from share owner and then plan it within that downtime window.
Volume Eligible For Rehost In NetApp Cluster Mode
The volume rehost procedures depend upon the protocol type and the volume type. Based on these the steps to perform volume rehost differs. Below is the brief summary for volume rehost for different scenario.
Rehosting CIFS volumes
You can rehost volumes that has CIFS shares. After rehosting the CIFS volume you must mount the volume and create a CIFS share in destination SVM. Volume rehost moves NTFS ACL so no need to worry about permission mismatch. To know how to create cifs share click the Link
Rehosting NFS volumes
You can rehost volumes that serve data over NFS protocol. After rehosting the NFS volumes, you must mount the volume create export policy and permission rules in destination SVM. Click the Link for more details on creating export-policy and rules.
Rehosting SAN volumes
You can rehost volumes that have mapped LUNs. After re-creating the initiator group (igroup) in the destination SVM, volume rehost can automatically remap the volume on the same SVM.
Rehosting volumes in a SnapMirror relationship
You can rehost volumes in a SnapMirror relationship. Before rehosting you should delete the snap-mirror relationship. After volume rehost you must create peer relationship between source and destiantion SVM. You should also create new snap-mirror relationship and schedule it for Sync.
Pre Check For Volume Rehost From In NetApp Cluster Mode
Volume must be online. Offline volume cannot be rehosted Volume management operations, such as volume move or LUN move, must not be running. Data access to the volume must be stopped. Destination SVM Configuration must match with Source SVM.
Post Steps Of Volume Rehost In NetApp Cluster Mode
After the rehost operation volume will lost Some configuration such as Antivirus policies, Volume efficiency policy, QOS, Snapshot policies , Quota rules, export policy and rules, User and group IDs. If any of the above feature was there for rehosting volume them you must create these in destination SVM as well.
You also need to mount the volume and the create new share. Good thing is that NTFS permission will be the same as it was in source SVM. Last thing is that you have to use destination SVM IP to access the shares.
Steps And Commands For Volume Rehost In NetApp Cluster Mode
Record information about the CIFS shares to avoid losing information on CIFS shares in case volume rehost operation fails.
Unmount the volume In Source SVM:volume unmount -vserver vs1 -volume vol1
Switch to the advanced privilege level:set -privilege advanced
Rehost the volume on the destination SVM:volume rehost -vserver vs1 -volume vol1 -destination-vserver vs2
Mount the volume under the appropriate junction path in the destination SVM:volume mount -vserver vs1 -volume vol1 -junction-path /vol1
Create CIFS shares for the rehosted volume:vserver cifs share create -share-name share1 -vserver vs1 -path /vol1
Point the DNS Host entry to IP of New SVM.
Checkout the YouTube Video on Volume Rehost In Cluster Mode NetApp. This videos has live demo for volume rehost. Subscribe to Channel for more such videos.
In this video we will see how we can recover a deleted volume in NetApp cluster mode. This features is available in data ontap 8.3 and in later version. If you have deleted a volume and this feature is enabled then you can recover that volume within certain period of time.
How To Recover Deleted Volume In Netapp Cluster Mode
To see if the feature is enable or not execute the below command
vserver show -fields volume-delete-retention-hours -vserver vs1 The value under volume-delete-retention-hours indicates the retention period of the deleted volume in a vserver. If its none then the feature is not enabled. In order the enable the feature execute below command.
vserver modify -volume-delete-retention-hours 8 -vserver vs1 Above command will set the retention period of 8 hours of all volume under SVM vs1. Below command will show what are the volume which are in recovery queue or in other sense which are in pending delete state.
volume recovery-queue show -vserver vs1 Below command will recover the volume from recovery queue
Question And Answer For NS0 158 Netapp Certification Exam
Here are some sample question and answer for NS0 158 netapp certification exam. This is also called as NCDA Netapp Certified Data Administrator for cluster mode netapp data ontap 9.1. This are sample question and not the expected question for real exam.
Regarding storage failover giveback processes, which statement is true?
A. During giveback, node cl1-01 simultaneously returns ownership of both root and data aggregates
to cl1-02.
B. During giveback, node cl1-01 returns ownership of all aggregates to cl1-02, before reverting the
data LIFs back to the home ports.
C. During giveback, node cl1-01 returns ownership of the root aggregate to cl1-02 before returning
ownership of the data aggregates.
D. During giveback, node cl1-01 moves ownership of the root aggregate to cl1-04 and ownership of
the data aggregates to cl1-04.
Answer: C
Explanation:
The following process takes place in a normal giveback. In this discussion, node A has taken over
node B. Any issues on Node B have been resolved and it is ready to resume serving data.
References: https://library.netapp.com/ecmdocs/ECMP1196905/html/GUID-E8DC7475-49ED-4397-
9F00-AC5CB2875CA5.html
NO.2 A customer has a 1,000 GB volume used as a NAS share that has 3x 100 GB files and has no existing Snapshot copies.
The customer creates a Snapshot copy of the volume, adds a 500 Gb file to the volume, and then
deletes one of the 100 GB files from the volume. How much free space is in the volume in this scenario?
A. 500 GB
B. 200 GB
C. 300 GB
D. 600 GB
Answer: B
Explanation:
Snapshot copies minimize disk consumption by preserving individual blocks rather than whole files.
Snapshot copies begin to consume extra space only when files in the active file system are changed
or deleted. When this happens, the original file blocks are still preserved as part of one or more
Snapshot copies.
References: https://library.netapp.com/ecmdocs/ECMP1368826/html/GUID-CF9E77A6-BDD9-4138-
A281-FC0E7BEA4C6D.html
NO.3 Which NetApp management tool verifies the disk-shelf cabling of an existing NetApp cluster?
A. System Setup
B. Config Advisor
C. OnCommand Unified Manager
D. OnCommand System Manager
Answer: B
Explanation:
NetApp Config Advisor is a tool that will allow you to check the health and ensure your NetApp
infrastructure is adhering to NetApp best practices. Once the Config Advisor query finishes, view the results and take corrective action on any configuration issues:
References: http://bestpracticetips.com/tag/config-advisor/
NO.4 You are configuring an ONTAP solution for FC host connectivity.
In this scenario, how should the cluster be configured? (Choose two.)
A. The SVM must be configured for Ethernet LIFs.
B. FC ports must be configured as initiators.
C. FCP must be licensed on the cluster.
D. FC ports must be configured as targets.
Answer: CD
Explanation:
You can configure the FC and the FCoE protocols on the SVM for SAN hosts. LIFs are created on the most suitable adapters and assigned to port sets to ensure data path redundancy. Based on your requirements, you can configure either FC, FCoE, or both the protocols. Before you begin The FCP license must be enabled on the cluster. All the nodes in the cluster must be healthy. Each node must have at least two correctly configured ports for each protocol (FC and FCoE).
NO.5 You have a FlexVol volume with LUNs and need to set policies to prevent an ENOSPC error on the host. In this scenario, which two commands will keep the LUN available to the host? (Choose two.)
A. volume autosize
B. snapshot autodelete
C. snapshot delete
D. volume size
Answer: B,C
Explanation:
ENOSPC is a UNIX operating system error that sometimes returns the message Not enough space is
available to service your request." The error message occurs because of a shortage of file system
space or lack of available media blocks. You can delete Snapshot copies manually, or automatically by enabling the Snapshot autodelete capability for the volume. Define and enable a policy for automatically deleting Snapshot copies by using the volume snapshot autodelete modify command.
You can use the snap delete command to delete a Snapshot copy before the preset interval to free
disk space or because it is a manual Snapshot copy that is no longer needed but is not going to be
automatically deleted.
Note: We get ENOSPC errors because Data ONTAP lets the Snapshot copy grow into the volume
space. Every write in WAFL is a write to a new block. If an old block is part of a Snapshot copy, Data
ONTAP needs to preserve the old block and the new changed block. This is not a problem specific to NetApp. Every storage vendor who supports a snapshot feature has to deal with it. There are two options when there is no space to accommodate the Snapshot copies: References: https://community.netapp.com/fukiw75442/attachments/fukiw75442/backup-andrestore-
discussions/5980/1/tr-3633.pdf
NO.6 To log in to the cluster with OnCommand System Manager, a cluster administrator account must be authorized for which two application types? (Choose two.)
A. HTTP
B. SSH
C. ONTAPI
D. service processor
Answer: A,C
Explanation:
You must have a cluster user account configured with the admin role and the http, ontapi, and
console application types.
References: https://library.netapp.com/ecmdocs/ECMP1636037/html/GUID-0E8373DA-D297-4FBA-9C4D-3AD3C169D37F.html
NO.7 When a two-node cluster is expanded, which cluster configuration would be supported?
A. a 4-node switched cluster
B. a 4-node switchless cluster
C. a 3-node switched cluster
D. a 3-node switchless cluster
Answer: A
Explanation:
If you are adding nodes to a two-node switchless cluster, you must have installed and configured the
cluster management and interconnect switches before adding additional nodes.The switchless cluster functionality is supported only in a two-node cluster.
References: https://library.netapp.com/ecmdocs/ECMP1636037/html/GUID-B13FF812-785E-4E62-
9914-30E7A8F51A4C.html
What Is And How To Create Flexclone Volume In NetApp Cluster
In this video we will see how we can create flexclone volume in netapp cluster mode. We have used flexclone volume CLI command to create flexclone.
Flexclone volume is also called as flexible clone. Flex clone are the point in time copy of an source volume which can be use for testing purpose. After flexclone creation what ever changes happen in any of the volume it does not effect each other data.
Flexclone Share the same space of it source volume means it will not consume any extra space from its container aggregate. If you want flexclone to be a separate volume then flexclone split operation can be done.
How To Create iSCSI LUN And Discover In Windows Host Netapp Cluster Mode
Today we will discuss how we can create iscsi LUN in SVM NetApp Cluster Mode and allocate it to a Windows Host. In previous video we discussed how to configure iSCSI in SVM Netapp Cluster Mode. Click here to know more about it. Below are the overall steps need to perform in order to create iSCSI LUN in SVM NetApp Cluster Mode and how we can allocate it to windows host.
How To Create iSCSI LUN And Discover In Windows Host Netapp Cluster Mode
Complete Steps to Create iSCSi LUN in SVM NetApp Cluster Mode
1. Create Volume in SVM
2. Create a LUN over the volume
3. Create PortSet in SVM
4. Create a Initiator group in SVM
5. Bind the Igroup in portset
6. Map the LUN to Igroup
7. Discover the device in Windows Server
We are going to discuss about each step one by one along with the command that we need to use to enable Create iscsi LUN in SVM NetApp Cluster Mode.
Step 1: Create Volume in SVM Netapp Cluster Mode
Below command will create a volume in SVM NetApp Cluster Mode. This step is necessary because a LUN can reside over a volume or qtree. The volume should be thick volume as per netapp best practice recommendation.
Step 2. Create a LUN over the volume in SVM Netapp Cluster Mode
In this step we will create a LUN over a volume. As per netapp best practice recommendation we should create a thick volume. In this command the “-space-reserve enable” makes the LUN as thick.
If your host operating system is Windows 2012, you must use the windows_2008 ostype. Space-reserve is enabled by default. If you want a non-space-reserved LUN, you must set the space-reserve option to disabled.
Step 3. Create PortSet in SVM Netapp Cluster Mode
Port Set are nothing but grouping of target iSCSI lifs. It is better to use ports sets when we have multiple targets on a node and you want to restrict access of a certain target to a specific initiator. Do not confuse port set with the physical ports.
Below is the command which will create a port set and add two iSCSI target lif.
You can see the port set details by executing the below command.
portset show -vserver vs1
Step 4. Create an Initiator group in SVM Netapp Cluster Mode
In this step we are going to create initiator group in SVM. This is also called igroup which is nothing but collection of initiator IQN number. In iSCSI lun allocation IQN are similar to WWPN in FC protocol.
Step 5. Bind the Igroup to portset in SVM Netapp Cluster Mode
In this step we will bind the igroup to the portset. Once this step is completed the the initiator will be able to communicate to the iSCSI target lif which are present in port set. Below is the command to bind an igroup to portset in SVM.
Steps 6: Map iSCSI LUN to Igroup In SVM Netapp Cluster Mode
In this step we will map or present the lun to the igroup1 and then the lun will be visible to initiator. Below is the command to map the iscsi lun to an initiator.
LUNs on your Storage Virtual Machine (SVM) appear as local disks to the Windows host. You must manually rescan disks to discover the new LUN. Below are the steps to do it for windows 2008 server
Steps 1. Open the Windows Computer Management utility:
Navigate to Computer Management Windows Server 2008 Start > Administrative Tools > Computer Management
2. Expand the Storage node in the navigation tree.
3. Click Disk Management
LUNs appear in Windows Disk Management as disks. You need to initialize the disk as a basic disk with a GPT or MBR partition table to create a drive. You need to format the LUN with a file system such as NTFS, below are the steps to do it.
Steps 1. Start Windows Disk Management.
Steps 2. Right-click the LUN, and then select the required disk or partition type.
Steps 3. Follow the instructions in the wizard.
Once these steps are completed you can go to My Computer and can see new drive. Make sure that you create and delete files in the drive. This concludes the steps on iscsi lun creation in SVM and present it to a windows server. Below is a Youtube video which explains more on each steps and commands. You can also like and subscribe to You Tube channel for more such videos.
How To Configure iSCSI In SVM And Windows Server Netapp Cluster Mode
Today we will discuss how we can configure iscsi in SVM NetApp Cluster Mode. Basically iSCSI protocol is used for LUN allocation to various host. In iSCSI the data transfer happens via network. This is why the performance is less in comparison to the FC protocol. You can try increase the performance by using 10G network port and by enabling Jumbo Frames. Below are the overall steps need to perform in order to configure iSCSI in SVM NetApp Cluster Mode.
Complete Steps to configure iscsi in SVM NetApp Cluster Mode.
1. Add iSCSI License is Netapp Custer
2. Add iSCSI protocol in SVM allowed Protocol List
3. Create iSCSI Server in SVM Netapp
4. Create iSCSI Lif in each node of the cluster
5. Discover iSCSI target in windows server
We are going to discuss about each step one by one along with the command that we need to use to enable iSCSI in SVM NetApp cluster mode.
Step 1: Add iSCSI License is Netapp Custer Mode
Below command will add the iSCSI licence in NetApp cluster mode.
cluster1::> system license add -license-code AAAAAAAAAAAAAAAAAAAAAAAAAAAA
Once the command is executed you can execute the below command to see if iSCSI licence added or not ?
cluster1::> system license show
Step 2: Add iSCSI Protocol in SVM allowed protocol list
Before we use any Protocol in SVM we need to check whether that particular protocol is present in the protocol list of SVM or not. Below command will show what are the protocol present in SVM.
cluster1::> vserver show-protocols -vserver vs1
If you see iSCSI in the output of above command then we can proceed for the next step. Else we need to add the iSCSI protocol in the SVM by using the below command
Step 3: Create iSCSI server in SVM Netapp Cluster Mode
In this step we are going to enable iSCSI Protocol in SVM once we done with this step then only we will be able to perform iSCSI operations in SVM.
cluster::> vserver iscsi create -vserver vs1
In order to verify if iSCSI service is enabled or not you can execute the below command
cluster::> iSCSI show -vserver vs1
Step 4 Create iSCSI LIF In SVM Netapp Cluster Mode
In this step we will create iSCSI lif. iSCSI lif creation is similar to normal lif creation only difference is that we have to mention iscsi protocol while creating the lif. In order to maintain the multipath we must create lif in each node of the cluster. Below is the command to create lif on node 1.
Now all the steps from Netapp side is completed. Now follow the below steps to complete the configuration from Windows Side.
Steps 5: Discover iSCSI target in windows server
1. Open the iSCSI Initiator Properties dialog box:
Windows Server 2012 Server Manager > Dashboard > Tools > iSCSI Initiator
Windows Server 2008 Start > Administrative Tools > iSCSI Initiator
2. On the Discovery tab, click Discover Portal or Add Portal, and then enter the IP address of the
iSCSI target port.
3. On the Targets tab, select the target you discovered, and then click Log on or Connect.
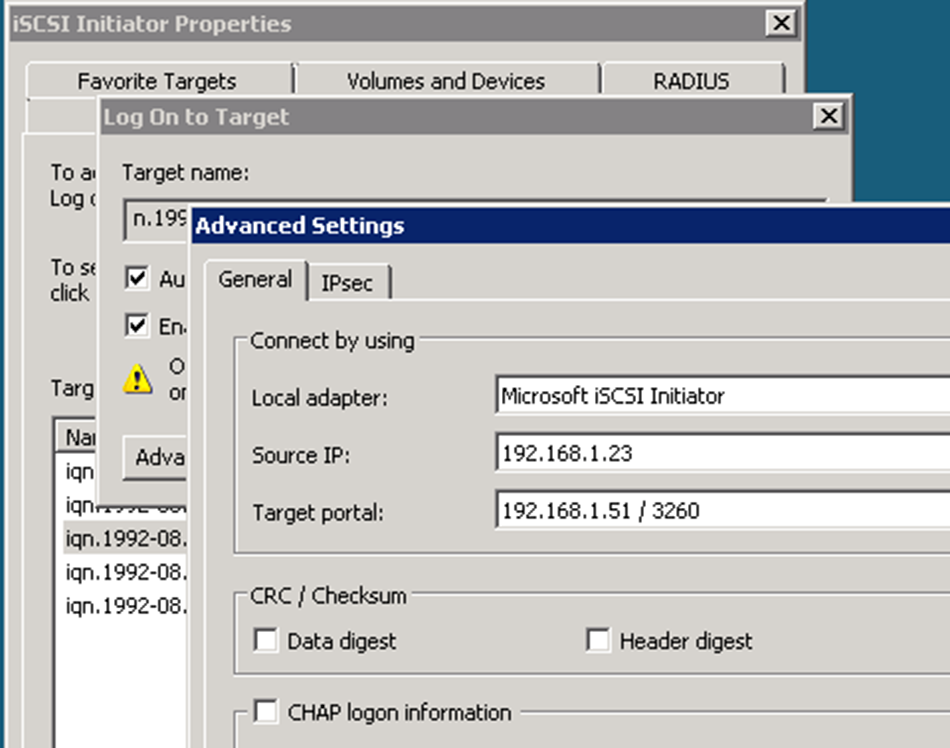
4. Select Enable multi-path, select Automatically restore this connection when the computer
starts or Add this connection to the list of Favorite Targets, and then click Advanced.
5. For Local adapter, select Microsoft iSCSI Initiator.
The following example is from Windows Server 2008:
iSCSI Configuration In Windows Netapp Cluster Mode
6. For Source IP or Initiator IP, select the IP address of a port on the same subnet or VLAN as one
of the iSCSI target LIFs.
7. Retain the default values for the remaining check boxes, and then click OK.
Once the steps from Windows side is done. We will be able to see the iSCSI initiator in SVM as well. Below is the command to see them.
cluster::> iSCSI initiator show -vserver vs1
Now the SVM is ready to server iSCSI traffic. Next step is to create a lun and map it to the windows server. In windows server the lun will be mapped as local drive and can be used for data operation. Check Out the YouTube Video which explains each steps in details along with the command line Demo. Subscribe to our YouTube Channel as well.
This video explains all possible things that you should know about inode in Netapp Cluster Mode.
Detail Explanation Of Inode Netapp Cluster Mode
What is Inode In Netapp Cluster Mode ?
An inode is a data structure or object which contain information about files in Netapp Cluster Mode. An inode is a data structure that defines a file, with an exception of filename which is stored in the directory entry. The inode number is an integer unique to the volume. Whenever a user create a new file an inode is assigned to contain all the information about the file.
What is the Size of One Inode In Netapp Cluster Mode ?
The size of a inode depends upon model to model. Based on the model and the block size of the volume we can say what would be the size of one inode in NetApp cluster mode. If a netapp volume has block size of 4 KB then the one inode will consume 4 KB of space and if the block size of volume is 32 KB then it will consume 32 KB of space.
Command to check block size of volume in netapp cluster mode.
In order to get the block size of netapp volume we need to run node level command. Below command output will give you the block size of all volume which belongs to node 01.
run -node Cluster-01 -command vol status -b
How To Calculate Maximum Inode Of Volume In Netapp Cluster Mode ?
The simple formula is total capacity of volume in KB divided by block size of the netapp. Below is an example where the total volume size is 20 MB or 20480 KB and the block size is 4 KB.
Formula For Calculating Maximum Inode Of Volume In Netapp Cluster Mode
Total Approx Inode = Total Size Of the Volume in KB/Block Size of the Volume
Total Approx Inode = 20480/4 = 5120
5120 is approximate value for maximum inode. If you want to know the exact value then select a value which is much higher than 5120 and try to increase the Inode. The Ontap will give you error and it will also have the exact value of inode that a volume can have.
How to Check Total Number Of Inode of Volume In Netapp Cluster Mode ?
We can check the total number of inode of volume in NetApp cluster mode by using two commands.
Command To Check Number Of Inode Of Volume In Netapp Cluster Mode
df -h vol1
Output of above command will show the total number of free inode and the used inode of a volume and the sum of those will give you the total number currently allocated inode for the volume. You can also use the below SVM level command to get total number currently allocated inode.
Command To Check Number Of Inode Of Volume In SVM Netapp Cluster Mode
vol show -vserver vs1 -volume vol1 -fields files
Output of above command will give the total number files that can be created in a volume which is also is the inode of the volume.
How To Increase Inode Of Volume In Netapp Cluster Mode ?
We need to increase the number of file of volume to increase the inode. As per Netapp best practice recommendation inode should be increased by 2%.
Command to Increase Inode Of Volume In Netapp Cluster Mode.
vol modify -volume vol1 -files 2000
If the value is larger than the maximum inode capacity the ontap will throw an error. This concludes the blog on Inode. Below is an YouTube Video to see the demo on how to perform all steps to increase the inode in Netapp Cluster Mode.
How To Create NFS Share In SVM NetApp Cluster Mode
In this particular blog we will discuss how we can create NFS share in SVM NetApp cluster mode. NFS share are used in UNIX server to store data so that Unix user can perform various data operations such as read write and modification or even deletion. NFS Share in NetApp cluster mode belongs to SVM.
Steps To Create NFS Share In SVM NetApp Cluster Mode
There are four steps to create NFS share in SVM Netapp Cluster Mode. First step is to create volume with security style Unix. Second step is to create an export policy. Third step is to create a rule Under export policy. Fourth step is to assign the newly created export policy to the volume.
In this particular blog we will create NFS share by using command line approach.
Step 1 Create A Volume With Security Style Unix
Following command will create a volume with security style Unix of size of 30 MB. SVM name is vs1 and volume name is share1 the junction-path is /share1.
Export policy is basically is combination of rules. These rules contains the access informations about UNIX server In which the NFS share will be mounted. Below command will create an export policy with name share1 in SVM vs1.
A rule in export policy contains the information about UNIX server such as its name or IP address what kind of access it requires and what protocol is going to use to access the data. Below is the command which will create a rule under share1
vserver export-policy rule create -vserver vs1 -policyname share1 -protocol any -clientmatch 192.168.15.173 -rorule any -rwrule any -superuser any
Step 4: Assign The Export Policy To The Volume Share1
This is the last step we need to perform. We need to modify volume’s export policy from default to the newly created export policy which is share1. we can do that by executing below command
We have completed all the steps which from Netapp end. Now we should give IP address or FQDN of SVM and the junction path of the volume to Unix administrator Unix administrator will use this information to mount the NFS Share. We need to provide the details in below format.
192.168.15.205:/share1
This concludes the discussion on how to create NFS share in SVM NetApp cluster mode. If you have any doubt or any knowledge to share please comment don't forget to subscribe our YouTube Channel And don't forget to share this blog as well.
Video Training On NFS Share Creation Netapp Cluster Mode